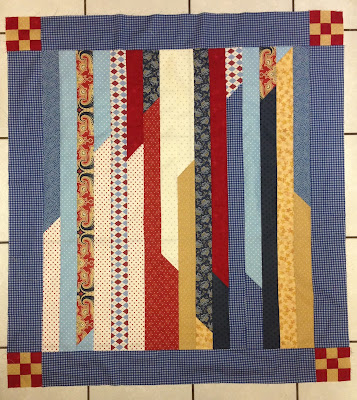
Well, it was time to make another super fast baby quilt! My hairstylist is expecting a baby boy next month. I will see her in one week (thank goodness) and wanted to give it to her then. One week - I had better get busy!
Side note to answer your questions: Yes, I have known she was expecting for months. Yes, I have known I wanted to make her a quilt - I love her! No, I didn't think I was running out of time. And lastly, yes, we have all been there.
Okay - time to get started! I reread my own post (I have slept many times since then) to review what I needed. I assembled my strips from my handy dandy 2 1/2" strip drawer. Here is what I pulled:
These were fabrics I had left over from the new SQUARED sample and BABY PINWHEEL sample. I am loving them together! I arranged my strips in a visually pleasing order, but know this is not necessary. It is just me thinking I am in control of how this quilt is going to turn out.
 |
| I started joining the strips on the diagonal. |
 |
| All chained pieced and ready! |
 |
| I trimmed away the excess and pressed. |
 |
| Grab each end, right sides together and sew, sew, sew... |
 |
| When I got to the end, I cut it apart. Press. Round one complete. |
 |
| Grab those ends and sew again! This is round 2. When I got to the end, I cut along this fold. |
 |
| Round three! Same as before, Cut along fold, press. |
 |
| Round 4 is the final round. I cut along this fold. |
 |
| Here is what my quilt looks like so far. Crazy how the colors mix themselves up (even after I tried to arrange them). Time to consider borders. |
I wasn't thrilled with how my finished product looked and I thought it needed a snazzy border. Last time I put pinwheels in the corners. This time, I considered more. I thought about rail fences, stripes and then settled on a nine patch in each corner. I wanted to pull the red from the center (where most of it ended up) out to the corners. I used the tan to help balance the blue plaid that was the rest of the border.
 |
| I cut 1 3/4" strips from scraps and sewed them as shown. |
 |
| I subcut 1 3/4" pieces and arranged them. I then sewed the nine patches together. They measured 4 1/4" at this point, so I cut my border strips this size. |
Time to quilt! I used a variegated King Tut (from Superior Threads) called Patriotic. Perfect! It has red, white and blue and will show up nicely on the light blue polka dot I am using for the backing.
 |
| Here is the back - I love how the thread shows up! |
I straight line quilted this one very much like my previous quilt. It did not take long - about an hour.
 For the binding, I cut my strips in half lengthwise so they were shorter and would give more variety. I also added in the 18" piece I cut off in the beginning. I joined them end to end on the diagonal. They pressed in half lengthwise. Super cute!
Why is it quilts are so much cuter when they are all quilted and done? The quilt is way cuter than it was when it was just a top. Just goes to show that all the parts of the process make the quilt.
I hope she likes it! It isn't fancy, I would call it a "useful" quilt. Not an heirloom, but a quilt that is meant to be used, washed and loved. I wonder what my 2 1/2" strip drawer will deliver next time!
Enjoy your day! Quilt for fun and love!
Susan


