Sunday, December 28, 2014

PILLOWCASES!


Ethan and Alanna opening their special pillowcases from Tia.


Have you recovered?


Our Christmas was wonderful.  On Christmas Eve we had everyone over for a dinner of soups, breads and dessert.  Easy stuff since the day is busy with food prepping, wrapping and cleaning.

Cindy made menudo, I made split pea and chicken noodle.  We had corn bread and ciabattini with lots of cookie desserts. 

I made the rum balls, ginger cookies and cranberry pie.  The rest I bought - no reason to go crazy!  If I were home I would have hit the deli (DZ Akins), but here I am good with Trader Joes.  We then headed out for church that night.  

Christmas day was spent at Cindy's with everyone.  Lots of goodies and gifts, ending with a great dinner and relaxing.


Then came December 26th.  All of it gets put away, cleaned and we return back to normal.  We will continue to snack on leftovers, lay around and watch movies, and generally do nothing, but I have to get that put behind me and cleaned up to relax.  Now it is time to plan New Years!


But now to tell you about my last minute Christmas project:


Pillowcases!

I got a crazy idea on December 10th: wouldn't it be great to make the kids a pillowcase for each month (like a banner of the month) with holiday themes and then one bonus for their birthday?  Great idea - but there are only 14 days left and I am working five of them.  Oh come on, how hard could it be?   So off to my stash I went pulling fabrics to create a boy set and a girl set.  Note: These are ideas that should be hatched during, I don't know, July?  Really.  Michael and Chich were giving me the "have you lost your mind" look, but I ignored them. 

After cutting out 12, it was time to take a break.  I could start on these and continue later.  Later like when, next summer?  I was still determined.  I started sewing and made four.  Okay, this isn't so bad.  

On December 19th, I still only had four.  Time to get going!  I made quite a few.  But on December 23rd - D-day for gifts - I had 8 left.  For six hours I plowed through with the help of streaming video.  Done!  Let me say it again, DONE!  

I was able to make them completely on the machine, and while my method is probably not the "proper way," I wanted to share the process.  Seriously, it took me 45 minutes to make one, which isn't bad if you are making ONE.  You could make one and put a book inside (use it as wrapping paper) for a birthday gift, which would be a much better idea.

Over 50 kits are available on the website (www.quiltintia.com) so you can get started early with holiday themed pillowcases and not wait until the last possible moment (you can thank me for helping you get started early).  They are priced at $9.99 each and include the pattern.  But, the directions shown below are step by step - much easier to follow!

Making the pillowcases:

You will need three fabrics: one for the body of the pillowcase, one for the flange, and one for the header.
Multi-color print is the main fabric, cream is the flange and blue is the header.
Main fabric : 27" x 40"                    Flange: 3" x 40"                   Header: 9" x 40"


For the seams, I prefer a french seam.  If you have a serger, you could just serge the edges all in one step.  Or, you could do a straight seam and zigzag the seams closed.  It is necessary to finish them off to keep them from raveling.

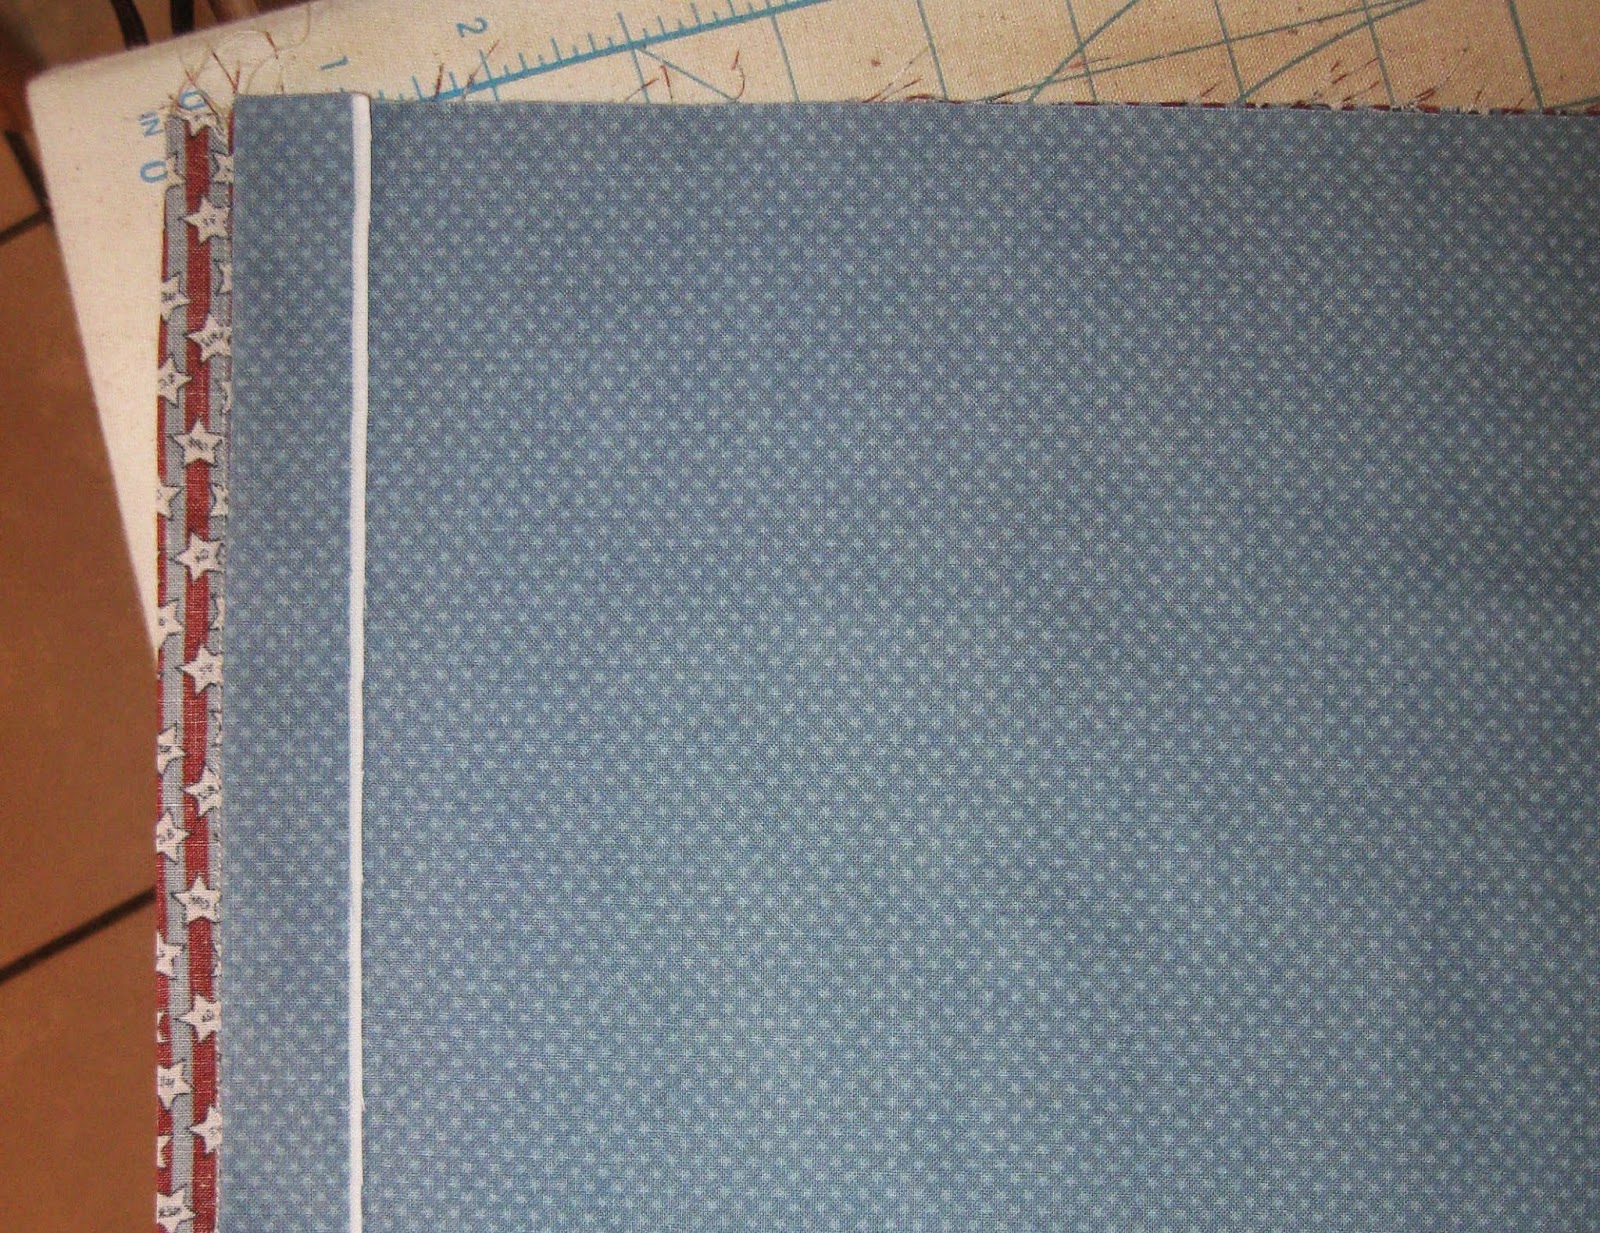
Using the main fabric, fold with wrong sides together, piece now measures 27" x 20".  Sew a scant 1/4" along two of the raw edges as shown.  The open end is the opening of the pillowcase.


 Trim off the corner to reduce the bulk.

Turn the pillow case inside out (right sides are now touching).  Press.  Along the two seamed sides, stitch a 3/8" seam.  This encloses the previous seam and keeps all those raw edges sealed.  
Now for the "not normal" part.   I lay the open end of the main fabric on my ironing board.  I then take the flange fabric (folded in half) and line up the folds (shown on the right side of the pillowcase).


Using my iron, I fold back the flange fabric at the seam on the pillow case.  This crease will be my sewing guide.  Could I just measure the main piece and then measure the flange?  Yes, but to me this saves a step.  

I turn the flange right sides together and sew the ends together along the ironed crease.  Now my flange is the same circumference as my main section.  

Repeat the process for the header.  

Sew along the ironed crease again.  

Take the flange section and press the seam open.  

Fold the flange lengthwise and press matching the raw edges.  

The flange will now be a big loop as shown.  

Press the seam open on the header.  

Along one of the edges, press 3/8" of the fabric over around the entire circumference of the loop.  This will help later when completing the pillowcase.  

Time to put it together!  Pin the flange to the right side of the main section of the pillow case as shown.  The raw edges will match.   I line up the fold to the main pillowcase section seam, and the seam on the flange to the fold on the pillowcase.  This keeps me from having the seams together and reduces the bulk. 


Add the header, pinning it over the flange.  The flange is now trapped inside the header and the main section.  All the raw edges are still meeting at the top.  Ease fullness as needed.

The folded edge should be visible inside (see the diagram)

Stitch a 1/2" seam around the pillowcase. 

Press.  But not just any kind of press - this is the key to not having your seams show.  Press all of the pieces to the opening.  This includes the flange (it will want to go the opposite direction).  

This diagram shows the seams.  All layers and seams are pressed to the header (opening).  

Bring the header around to the seamed edge.  Since it is pointing upward, you can bring the ironed edged over and enclose it.  Pin in place.  I bring the folded piece down over the seam about 1/4" so that I do not catch any of the flange in my seam.  The blue header is sewn only to the main fabric.  


Here is the header pinned in place

I like to flip it over and make sure I have not caught the flange in my pinning (saving me ripping many times). 

After sewing, press.  This time, press the flange back over the seam (covering it) and away from the opening.  This helps distribute some of the bulk and allows more of the header to show.


 Seriously, after you make the first one, they go quickly.  You will have a nicely finished pillowcase that will be enjoyed for many years!
Alanna (top row) and Ethan (bottom row) - January - December and a birthday one for fun.
It really is worth it.  This is the moment we all love, when they receive the special gift!   


Happy New Year!

Wednesday, December 10, 2014

Christmas is Coming


Christmas is coming...

Christmas projects finished yet?  I know this is where you all cringe.  Just to make you a little more uncomfortable, there are only 15 days until the big day!

Last weekend I decided to undertake a project for a gift.  Nothing like waiting until we are in full Christmas swing to come up with an idea.  But I will cut myself some slack, I have been VERY distracted.  But now with my degree finished, my mind is back to the wide world of quilting, cooking, cleaning and family.  And all of Tia's children said, "Amen!"

I won't be posting my Christmas idea here - all of my family reads this and it will ruin my fun.  But, I will post after the big day.  It is killing me not to share!  But you all are too busy burning the midnight oil working away on your projects anyway (or you should be, right?).

This year we are scaling back.  Not as many social obligations, not as many gifts, not as much "to do."  I am looking forward to my older son coming home for a week, not going to work myself for two weeks, and time with the kids (both big and small).  I plan on watching all my favorite movies, making my favorite dishes, and mostly just appreciating the most important gift - Jesus.

But for now, I am figuring the number of hours I need to sew, divided by the days left...

And now I must get back to it!


Thursday, July 31, 2014

The New A-OK Pattern for August - Chained

Hello there my quilting friends!

I am completely obsessed.  I will admit it.  And, I am okay with it.  My mind is consumed with five yard quilts: designing, making, bundling.  At night I lay awake thinking about possible patterns and fabric combinations.  Yesterday, I created different bundles of five yards for use with the new patterns.  I kitted the ones I had done and posted pictures.  Michael came home that evening to quilts and fabrics everywhere, no signs of dinner and a wife with a great big grin!  I was loving it.  You all know he didn't care, he was happy to see me so happy.  We did eat, at almost 9pm!

My only problem - my mind is running in all directions.  Oh!  I should put those together.... Oh wait!  It would be great to collage them on the website.... Oh!  What about a new design.  Whoops!  I need a picture of that quilt, where are the fabrics I used?  I have so many details to tend, I know I am going to need a few days to get it all straight.  Until then....

Our new pattern this month - Chained


This five yard quilt (of course) is super easy and there is NO MATCHING!

Yes, the pattern is available.

Yes, the fabrics are available.

Yes, the kit is available.

You're welcome.


New Fabric Bundles

As I mentioned, I have bundles up some great five yard groupings to use with our patterns.  Here are a few below:

     
Each grouping has the large scale print on the bottom, with the medium scale above it.  The light, medium and dark print are the top three.  Any of the patterns will work for these bundles - just pick your favorite.

Kits

When making my samples, some of them were fabrics from our store, some were from my stash.  Those that were available, we kitted them.  Below are a few of the kits.


Gallery

Since the patterns can be made with any fabric grouping, I created a page to show them off.  Please send your completed quilt picture and I will add it to the gallery for others to admire.  I love seeing patterns in other fabrics and how different they can look. 

So Much More in the Works

I am looking at adding new fabrics and am excited to offer more to you soon.  Please share our website, facebook, and blog with your quilting friends! 

Until then I will continue to try to harness my thoughts and get them to you through the website.  Enjoy life and happy quilting!

Susan/Tia

Tuesday, July 15, 2014

Peach Cobbler - A July Tradition

California Peaches
Growing up in San Diego, our neighbor had a huge peach tree that grew up over into our yard.  As our neighbor said, "Anything on your side is yours!"  So, every July my Grandpa Temple would climb up on top of our patio and pick the ripe peaches.  He would hand down the bowls and we girls would run them to the house where my Grandma and mom would be cutting up a storm.  As you entered the screen door, you would be overwhelmed by the smell of fresh peaches and the baking of cobbler.  The house would be hot, but who cares.  If you are getting cobbler it is all worth it. 

Years later, the smell of summer peaches would grab me as I entered the grocery store.  Our local grocery had them front and center. Who can resist that?  On Sunday, Cindy and I were making a run to the grocery for a few ingredients for dinner when I caught a whiff of it - peaches.  There they were, California peaches, with their soft fuzz and strong aroma.  We knew what we had to do, make a cobbler!

Here is my recipe which I believe is pretty close to my Grandma's.  It tastes like it to me. 

Crust - this is the secret.  My grandma taught me to make the best pie crust in the whole world.  I am ruined by it and find all others a little less than perfect.  I know, we all have our own favorites.  I am sharing mine.

In a bowl - Mix 2 cups flour, 2 tablespoon sugar, 1 teaspoon salt.

Add 1/2 cup oil, cutting it in with a fork until completely mixed and crumbly.

Add 5 tablespoons of water to the mix.  As you mix it will begin to hold together.  Divide in two, one for the bottom and one for the top.

Lay out a large piece of waxed paper and sprinkle with flour.  Grab one half of the dough and begin rolling it out thin to line the bottom of a casserole type dish.  You can use a 9x11 or 10x13, any dish that is glass and about 2-3 inches high.  Trim to fit or patch areas that are short.  Save the rest to repeat the same procedure when finishing up the cobbler.

Filling - here we go!  I am not sure how many pounds to use, but 10-12 large peaches is a good estimate.  They do cook down so do not be afraid to use a lot!  Begin by blanching them in boiling water for a just a minute.  Remove and put in cold water.  This makes them super easy to peel and worth the trouble.

Preheat oven to 450 degrees.

In a large bowl mix:

3/4 - 1 cup of sugar (I found I could use a lot less and let the peaches do the work)
1/8 teaspoon salt
1/4 teaspoon nutmeg
1/4 teaspoon cinnamon
3 tablespoons flour

Peel and cut the peaches into slices or chunks.  Sometimes they are so ripe you are lucky to just to get them in pieces!  Mix those lovely peaches into the bowl of dry ingredients, coating them.  Dump them into the bottom of your crust.  Roll out the rest of the dough and cover the top, crimping the edges to seal.  Sprinkle with a little bit of sugar and nutmeg on top of the crust. Poke a few vent holes in the top crust to vent.  It will look like the one below:

Ready for the oven

Do you see that the cobbler is a bit under the edge of the pan?  It helps to keep those juicy peaches from bubbling over and ending up on the bottom of my oven! 

Cook for 10 minutes, then reduce the temp to 350.  Continue baking until the crust is golden brown and the filling is bubbly.  I want to say about 40 minutes. Start at 30 and keep checking it.

We couldn't stand it, we ate it warm.  Even the kids loved it and Alanna had seconds.  I always think it is going to be a ton of work, but it goes quickly and is so worth it in the end. 

Enjoy yours!


Monday, July 7, 2014

Hello My Quilting Buddies!

It is summer and I have been home since the end of March.  Most of you know me as Quiltin' Tia, but I also have a superhero identity - Special Education Teacher.  I love my kids, love my job and love my school.  But, like all superheroes occasionally suffer, I had a setback - mine was cardiac arrest.  My fast acting team saved my life and I am here, back to my ever normal self, and preparing to return in the fall.  In true superhero fashion, the doctors could find no reason for my downfall.  I believe stress and exhaustion played a factor, so maybe that is my Kryptonite.  It won't stop me (maniacal laugh).  Okay, maybe it will slow me down a bit.

This time has forced me to rest - something I do not do well.  I have always filled every moment with a task to remain efficient and on top of it all. I am finishing my Masters degree this December and had already planned to take the summer to relax.  God thought I should do it sooner.  The upside?  I have had time to work on and finish an idea I had about five years ago for a line of patterns.  Needing something to occupy my brain, I began to design again.

Oh, how I have missed it!  I love to write and if there is math involved, even better.  I have been speeding along on my sewing machine dutifully testing the patterns patiently waiting to share them with you.  Seventeen designs and twelve quilts later I am ready (drum roll):


We are offering ten patterns initially with a new design each month.  The concept is easy:

5 one yard cuts = 1 great quilt (told you I like math)

Even better, I have created a video that better explains how the idea works and shows off the designs.  I like being able to talk with you this way!


Here is how it works:


Choose five fabrics using the "finger method" and you can choose ANY of the quilt patterns.  They all work for the same yardage.

You can also go directly to the website - click here - for a short explanation and the patterns.  

Let me know your comments on these new designs.  

Have a super day! - Susan/Tia

Tuesday, May 27, 2014

CHUCK IT, CLEAN IT, FIND A PLACE FOR IT - Continuing the Cleanout in the Kitchen


The office was such a success, I was ready to tackle the kitchen.  Not to be overwhelmed, I counted how many drawers and cabinets there were - 21.  I could do 7 each day for three days.  Done.

For many months I have had drawers that wouldn't open well, cabinets that spilled out when opened, and a general gross feeling to all of it.  This had me thinking we needed to renovate the kitchen - new cabinets, new design and a way to make it functional.  Guess what?  It wasn't what was needed.

Baking and Mixing
Bowls and Cups
Day 1 - I began at one end and worked through 11 cabinets.  I didn't mean to, but as I made room in some, I moved items from others.  As I moved stuff out, I cleaned the shelves, the doors and the surrounding area (floor tile, toe kick, counters).  Gross!  How did I let this stuff get like this?  Out went anything I hadn't used in the last year.  Out went items with missing parts.  Out went a lot of junk!


Spice Cabinet
Pantry
Day 2 - I wasn't as excited today to start.  I knew what a pain yesterday has been and knew I had the cooking side of the kitchen to do today.  I started in the pantry and tossed expired food.  Yikes!  That took about half of the stuff cluttering up the cabinets.  I cook all the time, but obviously I don't routinely use a lot of the special products that were old.  Spice cabinet, pots and pans, under the sink (gross) and I am done.  This was definitely the harder day and lots of scrubbing.

Lucky for me 'Hoarders' was on and a wonderful backdrop to motivate me!  I pulled the TV over and let it distract me while I worked.

A full trunk headed for Goodwill - that is a lot of stuff!

Finished, I stepped back and saw that the cabinets were not bad, just need some repairs (Michael will have to do those).  The kitchen is not too small - my cupboards are open and have room to spare.  There is not a need to renovate at all, I love how it looks and how it functions.  Actually, I am thankful it is the size it is.  I can clean it easily and quickly.  I would love a second oven and a wine fridge, but I can put the roasters in the laundry room on holidays and use the second fridge for beverages.  No big whoop.

I am in love again with my kitchen!

Now I am considering which room will be next.  Two biggies are the laundry room and fabric room.  Yes, fabric room (where we store our inventory).   I should call it now the "storage-and-don't-know-where-else-to-put-it" room.  The laundry room is the same.  It has a large pantry cabinet (what I thought we needed since our cabinets were bulging), a refrigerator, and where the cats live at night.

This will have to be done with careful planning.  The men in my house will have to be at work or asleep as these areas will require some serious culling.  Will they miss it?  No. Will they notice stuff is gone?  Yes.  My younger son, Chich, doesn't do well with change and will be hostile for a few days.  So what?  I live here and his dad and I pay the bills.  Get over it!  I have left his room untouched and allow him to live in filth.  Parental lesson - close the door.  But know that when his booty moves out, I will be scouring that room and turning into a glorious guest room.  I am already planning the quilt....seriously, I have the blocks finished and am dreaming!

I hope you are feeling empowered.  If I can do this - you can.  I don't do it for hours, just a few.  Like two.  If I don't have time to quilt, cook and do my routines I will be unhappy.  So, I quilt some, clean some, and then work on this project some.  It is all about balance and peace.  I am working to find both.

NOTE:  If you look carefully at the kitchen picture, you will see the cat on the chair in the office snoozing away.  I think we are all happy with the changes!


Wednesday, May 21, 2014

OPERATION CLEAN AND SIMPLIFY - One Room at a Time

My plan for the summer is to swamp out the house and reduce the amount of stuff.  I don't do well with too much around me for many reasons:
  • I don't like to clean it.  Seems simple enough but I LOATHE dusting.  If it isn't there or put away it won't need it.  I enjoy a clean house and want it to be easy and fast.  Too much stuff gets in the way.
  • Visual clutter makes me crazy.  I believe this is a by-product of my OCD.  When I walk through a room (or past one) I scan it.  If something is out of place or distracting, I don't like it.  I either have to fix it or continue thinking about it.  So, the answer is to get rid of it.  If something is left out by my son, I will immediately ask that he put it away.  This leads to him teasing me by saying, "If I don't put this away we will be on Hoarders."  To me it is just as bad.  Sick, I know, but there are worse problems to have.
  • A clean organized house gives me peace.  And we all know, I need some peace. 
Since April 1st, I have been on leave from my job.  Lots of time, right?  Not really.  I really did need to recover and became tired very quickly (I suffered a cardiac arrest on March 28th, was saved by my wonderful team at work, and am here to see many more days - smile).  I have done a lot of writing, creating and planning.  But now it is time to move.  I still have mobility and weight lifting limitations which will slow me down a bit.  Enough about that - back to the task.

What can I do first?  My least favorite but most necessary.  The files.  Meh.  Double Meh.  This is embarrassing, but here is a picture of the mess I need to tackle.  To make me feel better (and for you to know I am not a total slob) I am also including a picture of my sewing area.  Can you tell which I enjoy more?

Sewing Area
Filing Area


The plan for today:

I am going to set a time for one hour.  I can do that.  I will begin with the filing cabinet and remove anything I haven't used in a year.  If there are important documents (that I do not believe I will need) I will place them in a box, label it, and put it in my storage closet.

This should free up some space for newer files.  I long for the ability to instantly put my hand on something I need.  I do this now, but it requires plunging into closets, odd stashes and piles. To fix this, I must be diligent and get it done.

Could I procrastinate and do something else?  Well, yes.  I decided to write about it here instead of just jumping in!  But one hour.  Then I will get on with something more fun.  Then tomorrow I will do another hour. 

So right now I am setting a timer. 

Stay tuned...  I will post my progress (or lack of progress) and any tips or trials along the way. 

UPDATE!  Below are the pictures of the final project.  I continued to clean out the other areas of the office/sewing room and am so happy.  The storage boxes were on clearance at Joann's for $1.97 - 5.97.  We decided to get all different ones (since the selection was poor) and go with it.  Also, the picture of the paper cabinet (printing paper, envelopes, business cards, etc.).