Saturday, June 6, 2026

Two videos (and a few honorable mentions) that shaped my career in special education


Me in the center with my sisters.


Some of you may not know, but besides a quilt pattern designer and quilt shop owner, I am also a diagnostician and work in the public schools.  I was a special education teacher before that.  It is a career I found after raising my own kids, but the seeds were there from the beginning.  

I was a strange kid.  My mom would disagree but she has often said, "Well, yes, you saw things differently."  I was literal, loved math and science, and could not tolerate people who broke the rules.  I had a sense of fairness that when challenged frustrated me.  I know because these are the memories from childhood I remember the most.  I preferred to not socialize and would rather learn to do things or about things.  A true introvert. I would easily withdraw from others if their behavior or words were offensive to my ideals - children and adults.  I wanted to please and be smart. Yes, a weird kid.  

I observed my dad and his quiet way of disciplining my sister.  He would ask her to do something to which she would refuse, for example, sharing the last danish.  He advised, it is better to share with your sister.  She refused again.  He then said, "Alright, you may regret not sharing in the future," and walked away.  She was happy, she didn't have to share anything.  I was mad, but also intrigued.  I knew how my dad worked, and I learned a great deal from it.  Later that day, my dad called me into the living room to share some special treat with him.  Quickly, my sister followed and asked to have some as well.  My dad said no and reminded her that she had not shared earlier.  Nothing more was said.  It was enough.  This type of consequence based lesson was repeated often, I knew this was the best way.  No yelling.  No spanking.  It was natural consequences to learn lessons early, to avoid them in adulthood.  I used this often with my own children.  When I would say, "Okay, we'll see about that" shrug, and walk away.  The boys would follow and say, "No, no, no!" knowing later consequences may not be what they planned.  I learned to not give up, hold demands, and do it with love.  I was a stubborn kid, but a thinking kid.  My oldest was a strong willed kid as well.  I have a feeling my dad was too. 

Why say all this?  It will help explain why the two most memorable movie scenes from my childhood.  They sparked me to help and teach children which was my desire as a mom and eventually a teacher.  My work in special education was hard, most of it being in the self-contained classroom.  I said my passion was to teach the unteachable and love the unlovable.  I worked with behavior students, students with severe disabilities, and autism.  It was mentally and physically demanding, but often rewarding.

Okay, now to the first.  An old Elvis movie called Change of Habit.  The premise is out there - Mary Tyler Moore (another one of my favorites as a kid) played a nun and Elvis a doctor.  Elvis uses a technique called rage reduction with a girl with autism.  Watching I too wanted to help this little girl.  I appreciated Mary Tyler Moore's techniques, but was mesmerized by Elvis holding the child until she calmed.  It was my favorite part of the movie.

Here is the link to the video I found:


source: https://www.facebook.com/reel/1684760042229255

The other was from The Miracle Worker, the dining room scene.  The ability to work through the rage and be consistent was not lost on me.  I knew I could be that teacher.  Nothing was ever done in anger.  It was done in persistence to the lesson.  


source: https://youtu.be/Dvq5aQr1eh0?si=aqnY0mzKmI6HRUjV

I have been hit, bitten, punched, hair pulled, and hospitalized.  But more than that, I have made true connections to my students through trust and relationships.  Holding high expectations and following through with consequences.  My students never felt tricked or misled.  We got to the heart of the issue and through love, trial, and teaching found ways to grow.  I see things through their eyes.  I want to understand their perspective.  It is the only way I am able to create the lesson and redirect anger and frustration.  I understand where they have been and why they act out.  We validate our feelings, but do not excuse outward harm to others.  We get to the source and work on the skills to improve. I hope someday there is a student who can recall a lesson I gave or how I helped them understand themselves.  

A few honorable mentions.  I can't speak about my teaching style without Lean On Me and Stand and Deliver.  These of course came out when I was an adult so my love of them is more about the dedication to students and learning and not the sparks planted in childhood.  Still a good watch and we quote them all the time in our home.  


Wednesday, June 26, 2024

How new patterns are created... at least for me


Hello again my quilting friends!  I am off again for summer and so happy to have time to work at a slower pace.  I always have such big plans for my 6 weeks off: clean out everyting, reorganize, create new patterns, sew like crazy.  What I find, and this may be getting older, is that I do some things but my pace is a lot slower.  I find at the end of the day that I didn't finish that checklist I created in the morning.  Sure, there are a few things checked, but not all that I intended.  This makes me anxious as I see the return to work date approaching much more quickly than I would like.  No one wants to waste time, but I am finding I may need to let up on my expectations.

After the most brutal and hardest year in education to date (and I have been doing this for a long time), I am finding that I am just tired.  I am catching up on many doctors appointments, tests, and procedures that I could not find the time to do during the school year.  Everyone says, "You need to rest," but what does that mean?  I am letting my body sleep as long as it would like (and learning about how much sleep I really need), but beyond that what is it?  Is it laying on the couch binging a series on Netflix?  Maybe.  Is it reading a book?  This may also be.  But for me, my love is fussing with fabric and designs.  I also enjoy cooking dinner and dining with my husband.  Also in the mix, I am working on adulting by tending to the many doctor and dentist appointments that were not given the proper attention during the school year.  So, I am focusing on doing what makes me happy and healthy.  For me this is rest.  I am being purposeful in each thing I do, be it work or relaxing.  


Our newest five yard pattern

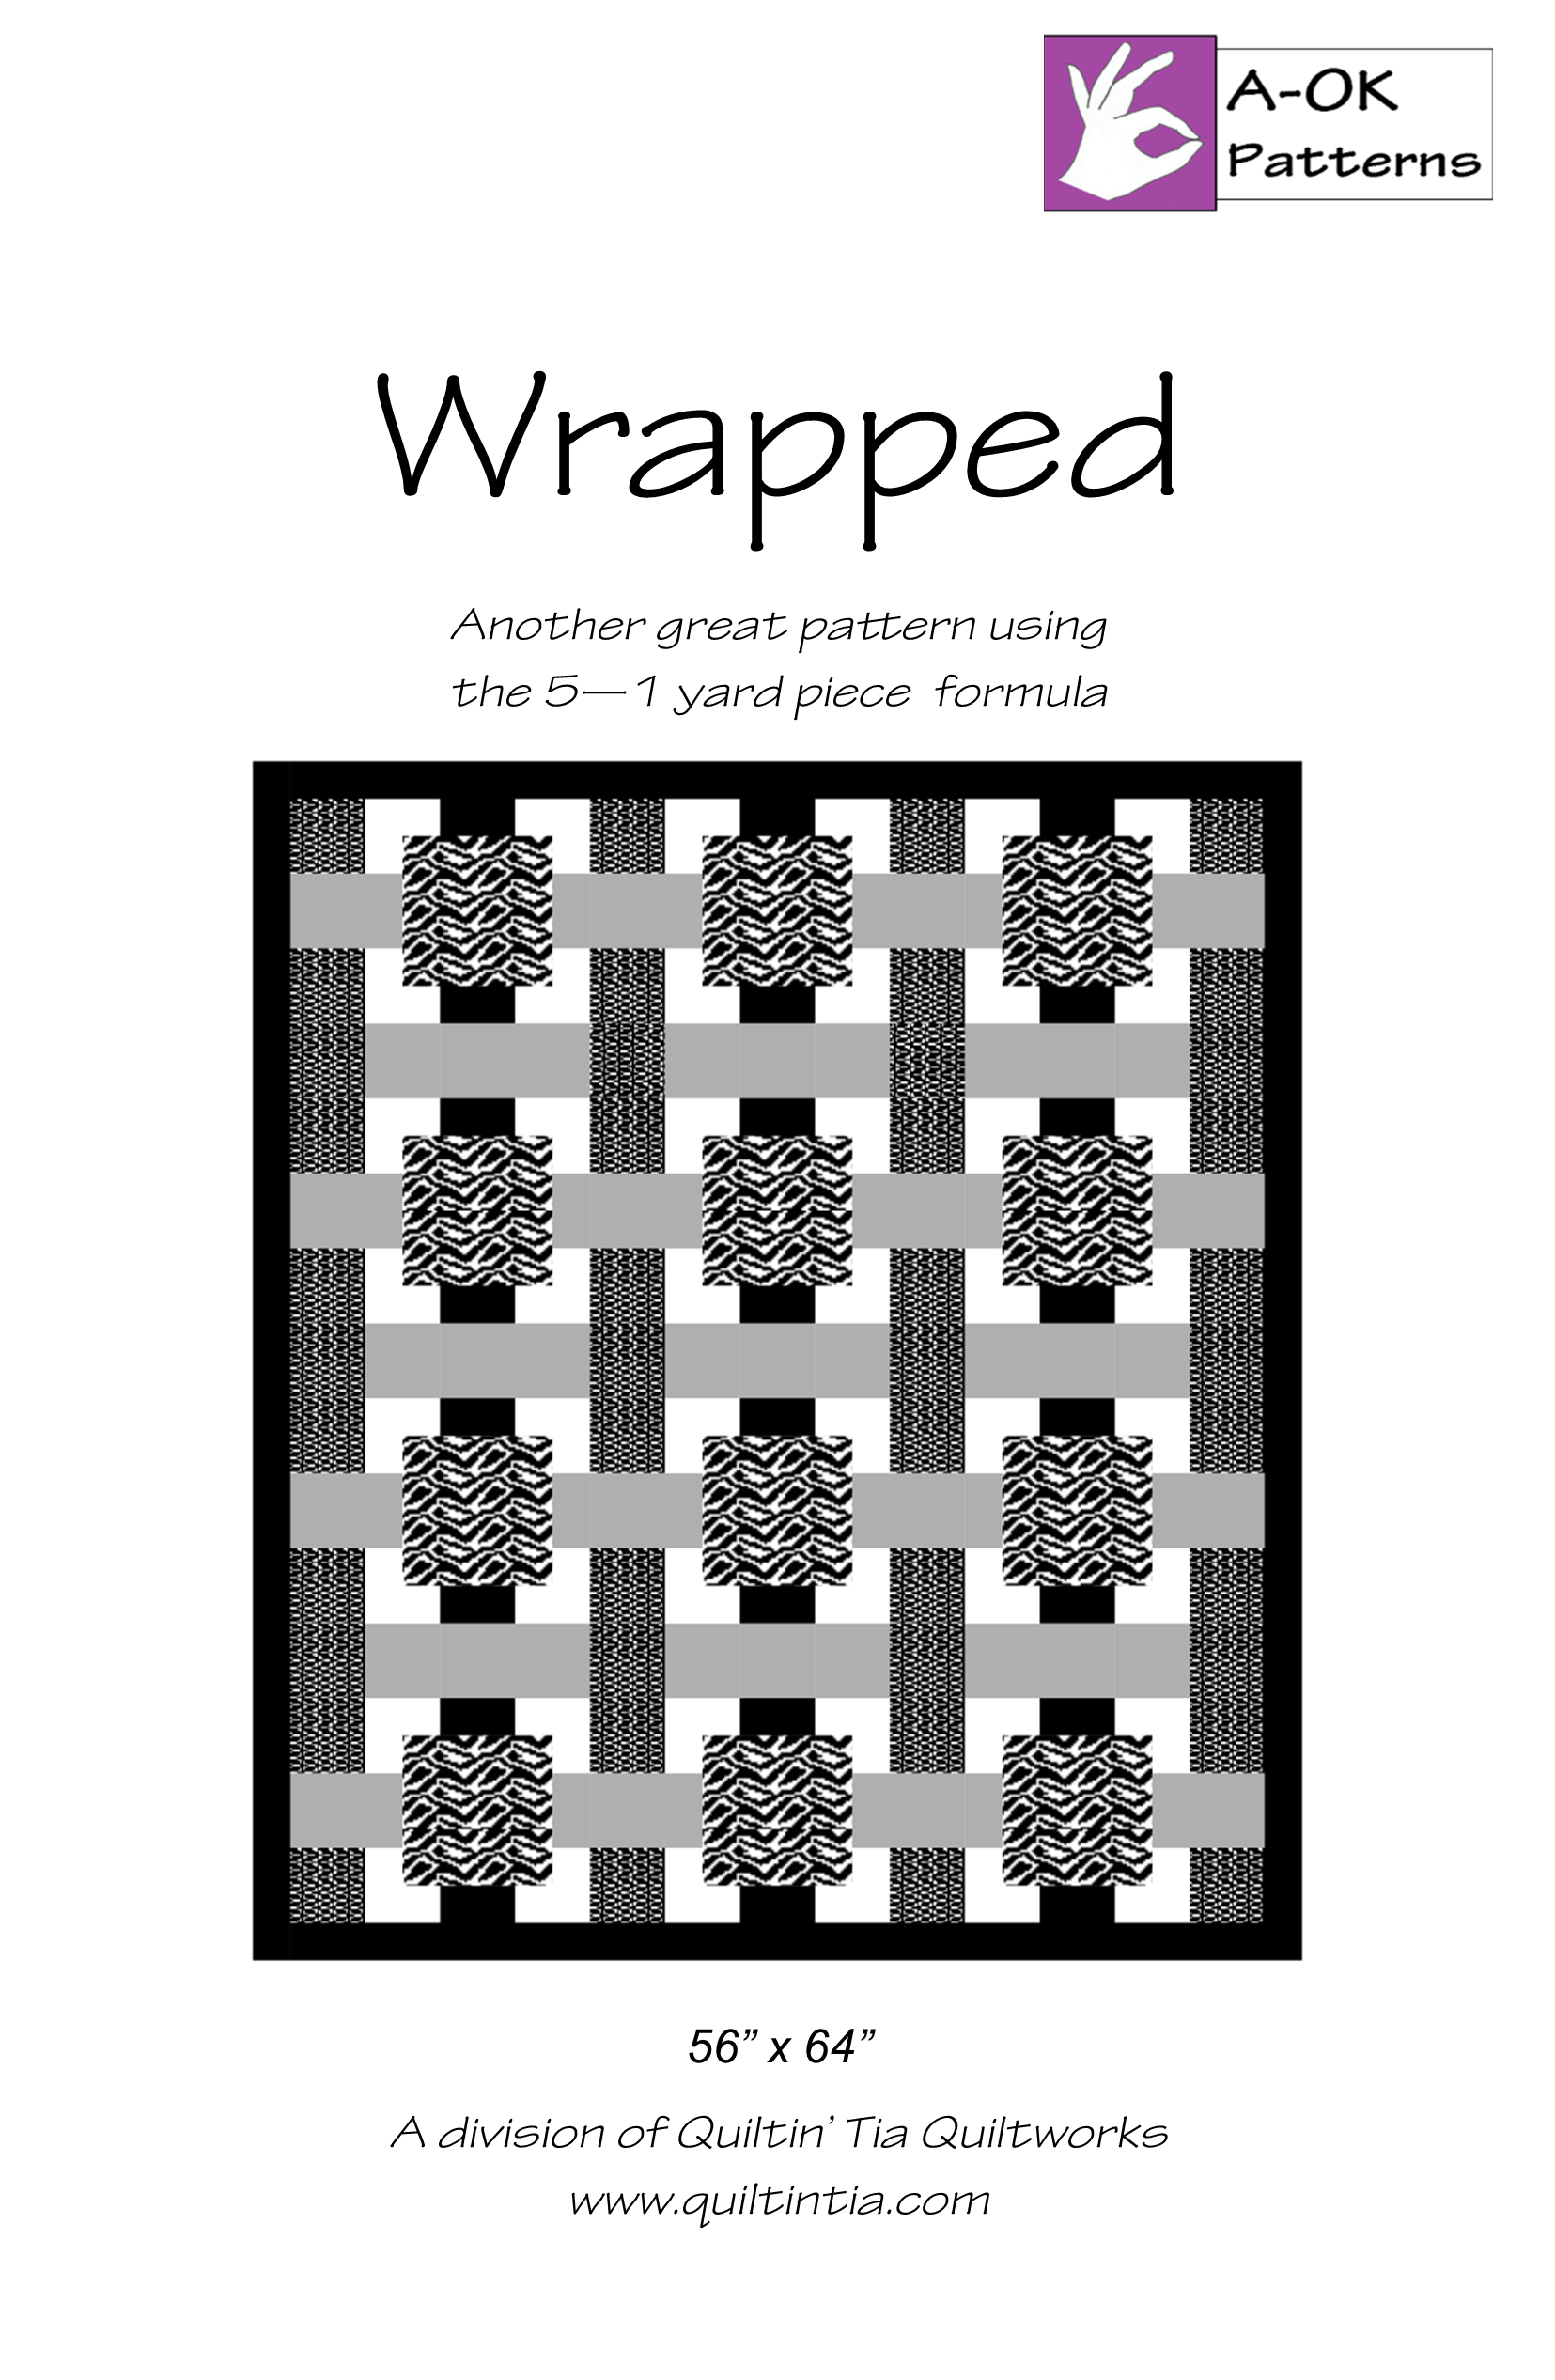
All that to say my brain can now begin designing and thinking about quilt patterns.  We debuted our newest A-OK pattern WRAPPED.  It was in the works for way too long.  For a lot of designers, they create a pattern and then plug in the fabrics.  For me, I am inspired by the FABRIC.  I am challenged by the panels, blocks, scale, and feel of it.  Lately, I have been challenged by 36" panels.  With the ability to digitally print, fabric has become less about the repeat and more about the detail and large scale designs.  Also, I am dared by directional prints.  This has been leading me to create large square blocks to the fabric can be turned the right way without much preplanning on the quilter's part.

Step 1 - ART

This piece gives me so much inspiration

Outside of fabric, I am inspired by nature and art.  Going to the art museum or delving into an era or artist lets me feel their feelings, see through their eyes, absorb the colors and style.  The way the sun plays with color in the sky depending on the time of day and season never ceases to inspire me.  Traveling to other places gives me the opportunity to see different lighting, different architecture, and different terrains.  The biggest for me is color and pattern.  My favorite color is what I call "Caillebotte Blue."  It is a graying, plum-blue shade that is featured throughout his work.  It warms me, is soothing, and I can't take my eyes' off of it.  I am always pleased when it pops up somewhere else.  I could stare at it for hours.  This is the art brain part of designing.  

Step 2 - MATH

The second part of designing is the math brain part.  Once I create a design I have to figure out how it will come together.  How will the small pieces become blocks and how will the seams be pressed.  How wide will this be and how much fabric is needed.  This is where some designs are trashed.  If it doesn't go together simply or quickly, it is a no.  If it won't work into a half yard formula or the one yard formula, or a precut, it is trashed.  Some feel this part is boring, not me!  I love math as much as art and playing with the numbers is exciting and challenging, like breaking a code.  

Step 3 - VERSATILITY


Wrapped shown in 4 different groupings

The third part is plugging in fabrics to see if the pattern is versatile and will work with many different styles of fabrics.  Does it have enough contrast?  Is the piecing worth it or is the design lost?  Kaffe is a great place to start for me.  If it makes those fabrics sing, we are good. 

Step 4 - TESTING AND PROOFING

I stink at proofreading.  My brain does not see typos or word form errors... seriously, it is bad.  I began designing because I needed pictures for my brain to understand and all I could find were wordy patterns.  I was lost.  When I write a pattern, I would happily leave all the words out and just make it like an IKEA direction sheet - pictures only.  But I know many of you are word people and need to hear the words in your head to understand so I do both.  I need others to proofread my text as this is where I make my mistakes - not in the assembly or math!  I then give the writing a rest and after I have forgotten what I wrote, I come back and make the pattern with fresh eyes, as if I have never known it.  I makes LOTS of changes as I sew adding additional arrows and tags to help make the directions clear for the reader.  My pattern tester is great at telling me when things are confusing and what is needed. I am so thankful for the help I have!  After that, it is ready for you my quilting friends.  

There is nothing better than standing in front of you on a Friday night and unveiling a new design.  It is the best.  I hope you are able be inspired by our designs and fabric combinations.  Putting bundles and kits together is what I love to do!  

See you all Friday Night!


Sunday, March 26, 2023

Finding Time to be CREATIVE

Finding Time to Be Creative

My first two completed blocks of the Everglow Quilt

This is a huge challenge for me personally. While my brain is constantly thinking about new ideas, I do not have the time to develop them and they often never leave the "I need to work on that more" phase. Why? Because like many of you, I work full time at a very demanding job that usually takes up 50-60 hours a week. That leaves evenings and weekends, but that time is used to "run" Quiltin' Tia, not "create" Quiltin' Tia.

The last few months have given me ice days and post tornado days. I am forever grateful. I wear a watch that tracks my heart rate and was reviewing it one morning and saw period of days that dipped. Guess when it was? The week we were off work. No one had expected we would be out an entire week and I did not bring any work home. Each day we waited to hear and each day it was extended. The gift of an unplanned day lowered my heart rate. I need to learn from that.

I need to schedule time with my sewing
machine.  If not I will never get to it.  
That ice week I made two quilt tops and created two patterns. It truly was a gift of time and a release from my routine. Did I get laundry done and cook - of course! Did I clean, absolutely. But the demands on my time were gone. There was no reason to leave the house, we couldn't. It was wonderful. And I learned that I need to, at least every few months, schedule a time where there are no demands. I am planning a week like this in June.

But what do I do now? It isn't June and I can't bottle up until then. I find little bits of time here and there. I sketch all the time while I wait. I do not wait well, so letting myself be creative keeps me from getting frustrated that I am wasting time (a huge pet peeve). Below are some ideas that may help you find that time to create a new project, develop an idea, or find a solution to something that has been troubling you.

I love baseball and will sew while watching

Schedule time for creativity: Just like any other appointment or commitment, schedule time for your creative work on your calendar. This will help you prioritize it and make it a regular part of your routine.

  1. Wake up earlier: Getting up earlier than usual can give you extra time to focus on your creative projects before the rest of your day begins.

  2. Make use of downtime: Look for opportunities to be creative during your downtime, such as waiting in line, commuting, or during lunch breaks. You can use this time to sketch, write, or brainstorm ideas.

  3. Limit distractions: Try to eliminate distractions during your creative time by turning off your phone or notifications, closing your email inbox, and finding a quiet space to work.

  4. Set realistic goals: Setting small, achievable goals can help you make progress on your creative projects and stay motivated.

Remember, being creative doesn't always require large blocks of uninterrupted time. By incorporating small pockets of creative time into your day, you can nurture your creativity and make progress on your projects. I can't wait until June to make a quilt, so finding little bits of time here and there can help me get the job done!


Wednesday, March 25, 2020

Good Morning and Welcome to a Brand New Day!

Michael and me on the train from Edinburgh to London, 2019

Times are crazy.  

Where do I begin?  I am not old, but am older than my kids and my students (and their teachers).  I have lived longer and have experienced many crises.  This does not make me an expect - I do not know the answers.  What I do know is life is hard.  But in the same way, life is fantastic.  From the time I was little I watched my strong grandmothers endure hardship, loss, and change.  I admired their sensibility, wisdom, and calm.  And while the waters were uncharted, they relied on previous sailing experience.  They knew what should be done and that this too shall pass.  They came out stronger for it.  When my grandfather died, I watched my grandmother move into action: making calls and plans.  She was heartbroken, grieving, and in shock but remained focused and poised.  I never forgot her strength.  I wanted to be that person when I grew up; the one who could stay calm and focus on the tasks to be done; to be the comfort and the strength for others.  I try, but I get tired, discouraged, and sad at times, too.

Times are challenging.  I am not saying that things now are not hard.  They are.  So was 9/11 when everything changed.  And in 2008, when everything changed again.  Those experiences give me cause to worry about this crisis.  I worry for small businesses remembering what happens in hard financial times.  I worry about my students that are not able to come to school, the ones who come because we are their happy and safe place where they get hugs and are fed.  And I am sad.  My mother turns 75 next week.  We had planned a big family dinner at her favorite restaurant.  With some family members at risk and others exposed we have to cancel completely.  My spring quilt shows where Michael and I enjoy time with our quilting friends as well as each other have all been cancelled.  The way I do my job has changed.  My nephew misses out on the rest of his freshman year of college.  We can and should be sad.  Our plans have changed and some things cannot be regained.   But some things have gotten better and this morning I am looking to those for inspiration.

Leading the way.  In the last few days, I have watched people come together for one another in ways I never saw before.  I am following my nextdoor app (now that I have time) and am finding so many people reaching out and helping others all while maintaining social distancing and following the new norm.  I had a call yesterday from a shop owner in New York who called just to chat about my patterns.  She took the time to reach out and make the connection - it was greatly appreciated and brightened my spirit.  So from this (still developing) crisis I have learned we must reach out and take time now for one another.  Many of us are finding our schedules wide open while others are now bogged down with work and responsibilities as they try to maintain some form of normalcy and balance.  We are being called on to care for each other, not in person, but in action and words.

We will adjust.  I am adjusting to limited availability of the food items I normally buy and the ability to get things immediately.  My sacred four week hair appointment may not happen and I will live.  These are not important now.  As my calendar opens I am taking time to breathe.  It is time to think about priorities and reset.  From each difficult situation in my life there has been loss but there has been new life.  After my dad died, my once full days were empty.  That summer I began to write quilt patterns.  When I died (cardiac arrest - this is the shorthand way we talk about that day in my house) I spent my recovery time reevaluating my life and started writing five yard patterns.  In 2008, we lost so much but then returned to school and now Michael and I work in new fields that we love.   Each situation has molded and changed me.  I have grown.  I am thankful for all things and know that God is in charge no matter how much I try to be in control.  So after the forest fire of this virus, I will look for the new areas of green and see what is built to replace what has been lost.

So for now, we should seek peace.  Love our family (as we are probably sequestered with them).  Play games, cook, sleep, be outside (it is spring and lovely).  Give thanks as we do have so much for which to be thankful.  Show love and compassion to those that are suffering.  Give what you can in your kind words or support.  Be strong.  Be the light.  We are all in this together.  


Monday, January 1, 2018

Christmas ham... what do you do with the bone?


Happy New Year all of my lovelies!  We are super chill this new year.  We did not host a New Year's Eve dinner party for a few reasons.  Our kids were all home for Christmas.  Typically we hold off our family time until New Year's when they return.  Instead, we had ALL the family (18 total with 3 dogs) here for Christmas.  By New Year's we were beat and opted for a quiet night.  Also, Michael worked New Year's Eve which meant we were up at 5:30 that morning.  It turned out to be a good idea - we had super cold temps for our area and some ice on the roads.  

This girl was in bed by 10pm and stayed in my jammies until well after 2pm.  There is one thing I did do, I used up that leftover ham to make a few tasty dishes.  One is ham and pinapple fried rice (I will share that one in a future blog), the other is Split Pea Soup.  So many times we save the bone, knowing we should do something "good" with it, but end up throwing it away because we never figure out what to do or get around to it.  This is a great crock pot recipe, and great for a winter day when you are SICK of cooking.  Just layer up the crock pot, turn it on, and get back to those netflix shows that aren't going to watch themselves.  


Tia's Split Pea Soup

Layer the following into the crock pot:
1 pkg of 16 oz split peas, well rinsed
1 onion, chopped
6-8 carrots, peeled and thinly sliced
6-8 ribs of celery, thinly sliced
2 cloves garlic, minced
2 bay leaves
2 tsp garam masala
1 tsp cumin
1/4 tsp coriander
1/4 tsp cardamon
1/2 tsp salt
1 tsp pepper
  
Fill with water until 1" from the top.  Cook for 5-6 hours on high, or 10-12 on low.  Remove the ham bone and bay leaves.  Stir, mashing the peas if needed.  Usually mine just fall apart as I stir.  Really the soup is best the day AFTER I make it.

I always stash a few baguettes in the deep freeze from Trader Joe's.  I pulled one out and toasted it up in the oven.  It was perfect with this spicy soup.

Now jump back on that couch and snuggle in while you enjoy your big bowl of tasty soup!


Monday, October 2, 2017

Trick or Treat! Halloween Fabrics and Trick or Treat Bag Directions

Hello Quilting Lovelies!  Halloween is just a few days away, but you have time to whip up some trick or treat bags before then.  Below is my easy and fast pattern for a super cute trick or treat bag.  To help you out more, we have a Halloween fat quarter bundle at a special price.


12 Fat Quarters for $15


The pattern below uses just two fat quarters, you could make 6 bags for $15.  All before the big night!


TRICK OR TREAT BAG


My niece informed me that our youngest baby does not have his own trick or treat bag!  This will not do!  I decided to recreate a bag I made a few years ago and share the pattern here with you – all my quilting lovelies!

You will need:

2 fat quarters
3/4 yard decorative trim (optional)
1 fat quarter size of interfacing or thin batting (optional)
The usual: Your sewing machine, thread, etc.

Cutting the fat quarters:

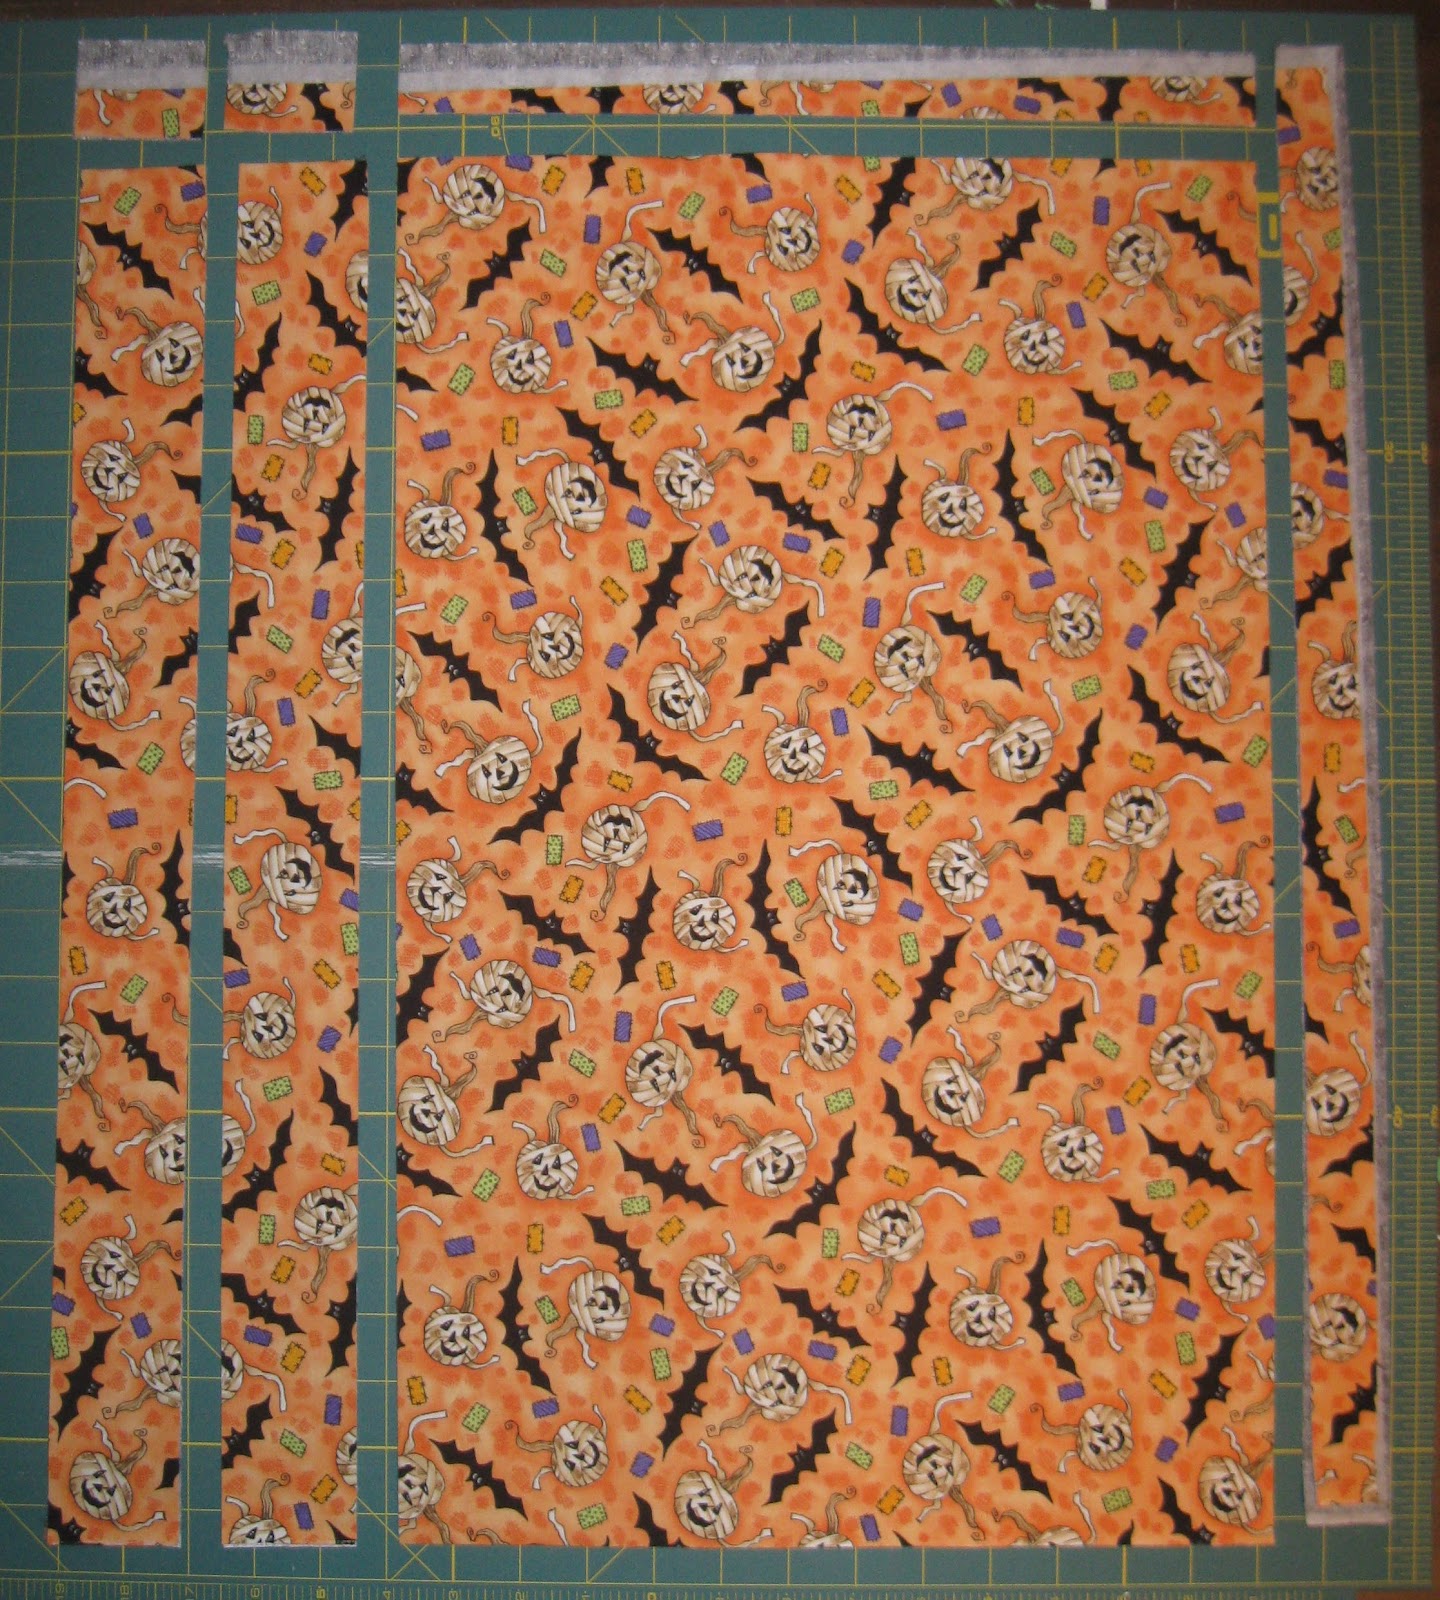
I laid my fat quarters one on top of another and cut the following pieces:

2 - 2" x 20" (those are the ones on the left)
1 - 13" x 20" (the big piece)

I wanted to use an interfacing to give my bag some body, so I laid it right between the fat quarters while cutting.  A fusible interfacing would work great.  You would fuse it to the back of your fat quarter BEFORE cutting it out. 

Time to get sewing!  For purposes here I will call the pieces by the colors I used. 

Place one black strip and one orange strip right sides together.  Sew 1/4" from the edge along both long edges.

Turn the straps right side out and press.  You will have two straps for your bag.

I always do these first. They are a pain to turn right side out.  I feel so much better knowing they are done!

Time for the bag.  Since our bag is lined, we will be making what will look like two bags - one orange, one black.  

Fold the fabric onto itself right sides together so it now measures 13" x 10". Stitch 1/4" from the side and bottom, leave the top open.

Next is a little trick that will make the bottom of the bag boxy.  It makes the bag hold its shape instead of just lying flat.

Grab one of the bottom corners of the bag and fold it as shown.  Measure down 2" from the point and draw a line.  It is helpful to use a clear ruler so you can line the seam up vertically and assure your horizontal line is perpendicular to the seam.  Just a stickler step, I don't think being a bit off would mess up your bag!

Pin the corner and stitch along the drawn line.  Trim away excess fabric to 1/4". 

Repeat for the other corner of the black piece, and both bottom corners of the orange piece.

Pinning the straps:

Turn your bag piece right side out and lay it flat with the seam on the side.  Position one of the straps to the bag as shown with right sides together allowing the strap to loop alongside the bag.

You will want each end  approximately 2" from each side of the bag.  Pin in place.  Flip the bag over and repeat for the other side with the other strap.

Stitch the straps a scant 1/4" from the edge.  You want to be slightly less than 1/4" so that when you are done your stitching does not show, it will be inside the seam allowance.

Place your lining (mine is the black) around the bag as shown.  You want the right sides together at this point.

Match the side seams and pin all around the edge.

Sew 1/4" around the top leaving a small opening to turn your bag right side out.  That opening will be stitched closed later.

Turning the bag right side out can be a chore.  Be patient and work it out slowly.  I want to make a birthing analogy, but I am holding back.

After the bag is right sides out, carefully pin closed the opening and whip stitch closed by hand.

Okay, you can stop laughing now!  You know I put that bad boy on the machine and stitched it.  I am not going to stop this close to being done for hand sewing.  Silly quilter...

Your bag is finished, or it could be.  I am going to embellish mine a bit but it isn't necessary.  Just know it is fine to stop at this point and love your new bag.

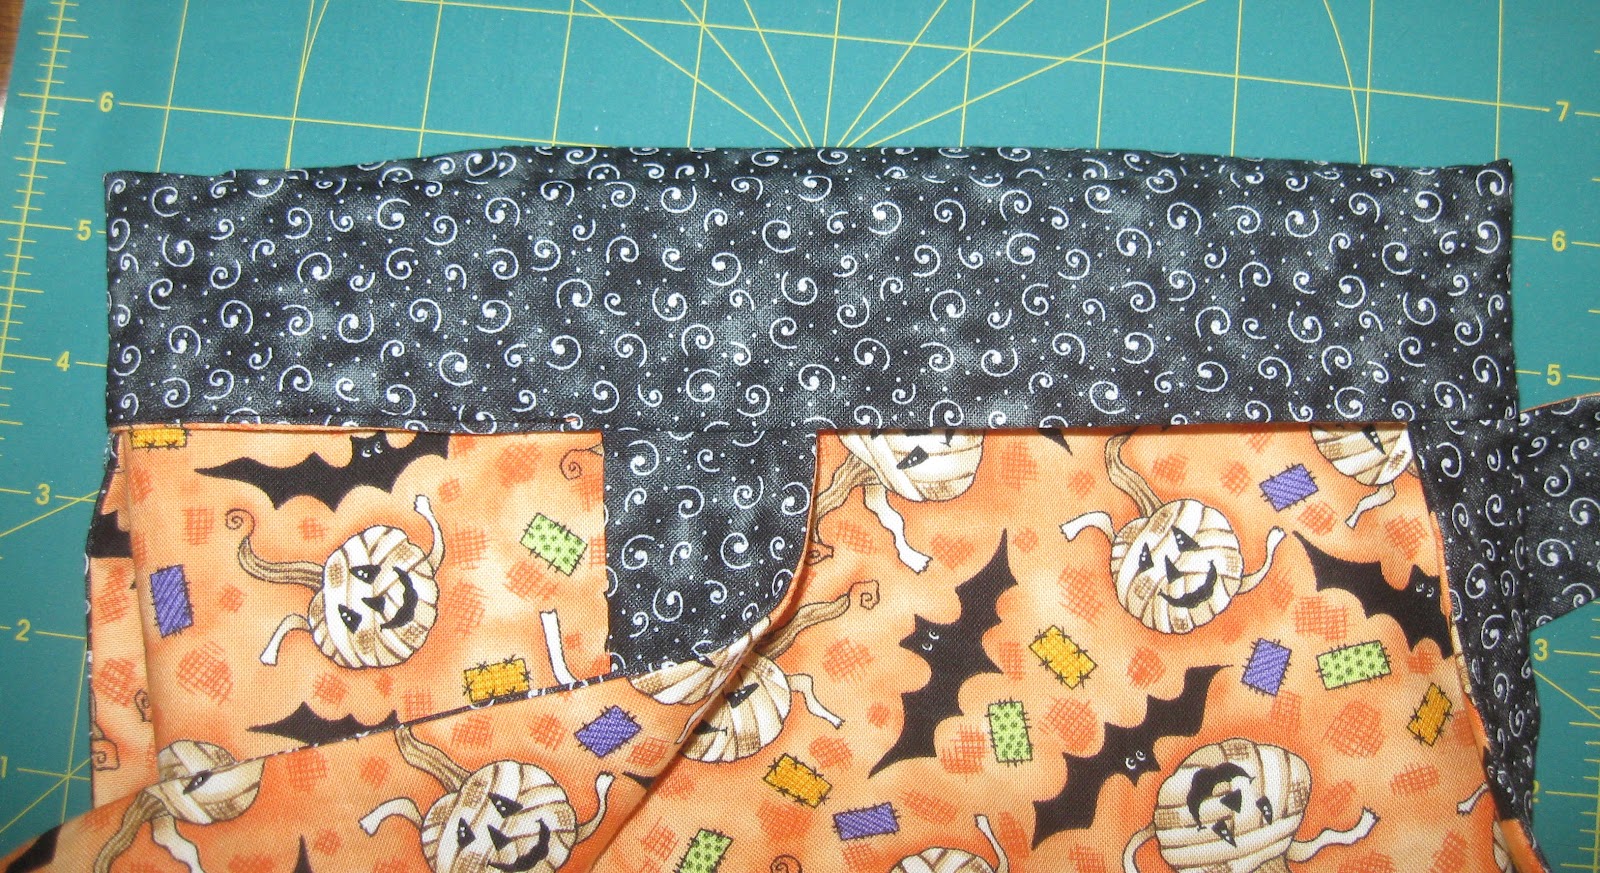
For my bag, I want to fold down the edge to show off the lining.  I turned it down about 1 1/2" from the edge.

I have to position the straps so they would remain straight and pin it all in place.

At this point if I were a careful quilter, I would machine stitch the fold down before adding the trim.

You all know I am not careful.  I dove right in and began stitching away - adding the trim while stitching down my folded edge.  Oh what a rebel I am!

I overlapped the trim when I rounded around and back-stitched a bit.  I will be honest, some of the thicknesses required patience but I made it.

And it is worth it!  I love this little bag and I know my little one will be the envy of all the other little trick or treaters with his cute bag on Halloween Night. 

Tuesday, August 8, 2017

New A-OK Pattern and back from the Quilt Show


Hello all of my quilting lovelies!  I hope your summer has been relaxing and involved some fun with friends and family.  Last night we had a wild thunderstorm that left our yard littered with tree branches and knocked over some items.  Poor Michael will be cleaning up for a few days.  I heard this morning we received between 3 1/2" and 4" of rain from the storm.  Rain is always welcome, but wow!  Good news is that we never lost power and nothing hit the house or cars (or hard enough to hurt them).  Always an adventure!

We just returned from Temple, Texas where we were a vendor at the Wildflower Quilt Guild's Quilt Show.  This group is always so sweet to us.  We were given a tour of the First United Methodist Church in Downtown Temple.  It is over one hundred years old and a stunning building; full of rich history.  If you are ever in Temple, I would suggest attending a service there.  Incredibly stunning.

First United Methodist Church of Temple, Texas

A big public thank you to the quilt guild.  Like it or not you all are stuck with us now!  We will be back soon!

I wanted to share some pictures of our booth.  This was the first time in a while we vended at a show, and we were a bit rusty.  In the end we figured it out and had a great time.  If you would like us to vend at your show, please email me - we would love to come.  We also do speaking engagements and workshops.  Information for that is on our website www.quiltintia.com.


Those of you may have noticed a NEW pattern.  Yes, we have a new five yard quilt pattern called Garland.  It is featured here in Paige's Passion - Blue bundle.  It was one of the easiest quilts to put together and finished perfectly.  It would work just as well with the Paige's Passion Pink Bundle.  I have included those images below.

Garland - Paige's Passion (BLUE)
Garland - Paige's Passion (PINK)


Here are a few other options:

Garland - Apricot and Persimmon
Garland - Desert Bloom (RED)
Garland - Dutch Treat
Garland - Era of Jane Collection (Blue)
Garland - Hello Gorgeous!

Well - what do you think?  We would love to see your A-OK quilts and share on the website.  You can see other quilter's projects on the Gallery page.  You could be there too!

Have a wonderful week!  

Susan/Tia


Friday, June 30, 2017

30s or not to 30s, that is the question...

Our 30s section in the Quilt Shop - we called it 30s Street
Hello all my quilting lovelies!  Do you like 30s fabrics?  Or are you puzzled by the interest in them?  I have found that either you love them or you can't figure out what the big deal is with these old prints.  Are they out of fashion in the quilt world?  These are all questions I do not know how to answer.   Personally, I love vintage stuff.  Someday I will have my mahogany twin beds refinished, set up in a guest room and decked out with the two twin 30s quilts I made.  I have embroidered vintage pillows that I plan to place on each one.  These pastel prints remind me of my Grandma Evelyn.  Her love of pink was evident throughout her home.  

But there is another side of 30s prints.  The brighter side using primary colors that seem perfect for little ones.  I used a mix of red, blue and yellow 30s when I made a baby quilt for one of my dearest friends.  They were classic.  I knew they would work for a boy or girl and were not based on passing color or character fads.  That once little baby girl is now 15 years old and she still has the quilt in her room.  

You can gather from my quilting experiences that I am one of those that LOVE 30s fabrics.  So when the opportunity came to order some, I did just that.  I went with the brights since they work for boys and girls.  They are classic in color and style.  

Toy Chest 2

There are seven prints from which to choose.  We have a fat quarter pack for your 30s stash!


Need some ideas? We have created five different baby bundles and kits.  But remember - any four half yards will work with ANY of the Baby A-OK patterns.


Have a fun and safe Fourth of July with friends and family!

Susan/Tia